
Implementing SSL with Load Balancing for Oracle MWA
Over the years, there are many Oracle E-Business WMS and MSCA customers who are looking to enhance the security of communication between the mobile MWA users and Oracle MWA server. As we know, the MWA server used in MSCA and WMS natively runs in Telnet protocol where all data including username and password are sent in cleartext. One of the ways to secure the communication is to encrypt the data between client and server and this can be done using SSL (Secure Sockets Layer).
In a recent update, Oracle added SSL support in the MWA server. However, SSL is not supported by MWA Dispatcher, confirmed in “Does MWA Dispatcher (MWADIS) Accept SSL or TLS Connections? (Doc ID 2175344.1)”.This is unfortunate as many customers are using MWA dispatchers to load balance their MWA users. In such case, to make SSL work customer has to either connect the device directly to the MWA port or use other types of load balancer which supports SSL passthrough.
This document is written to help customers in two regards. First, it describes steps to enable SSL in the Oracle MWA server. For reference, please read the information in the note “Oracle Mobile Supply Chain Applications for Oracle E-Business Suite Release Notes (Doc ID 2108155.1)” to enable SSL in the standard Oracle MWA server. Second, it introduces a high-performing popular software load balancer called haproxy and shows how to use it to load balance multiple MWA ports running in SSL mode.
The high-level steps are as follows:
- Generate an SSL certificate, we can either get this from a trusted provider (paid) or we can generate a self-signed certificate (free)
- Configure mwa.cfg to enable the SSL
- Restart MWA service
- Install and configure haproxy
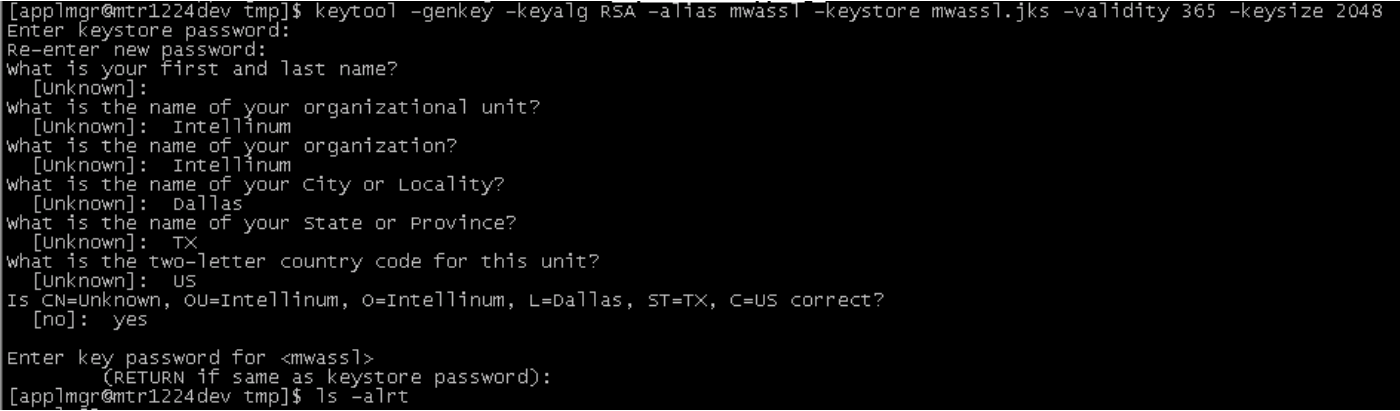
To generate a self-signed SSL certificate using the keytool command on the Oracle EBS application node:
- Open a command prompt or terminal
- Run this command
- keytool -genkey -keyalg RSA -alias tomcat -keystore mwassl.jks -validity <days> -keysize 2048
- Where <days> indicate the number of days for which the certificate will be valid.
- Enter a password for the keystore. Note this password as you require this for configuring the server
- When prompted for a first name and the last name, press Enter to keep it blank.
- Enter the other details, such as Organizational Unit, Organization, City, State, and Country
- Confirm that the information entered is correct
- When prompted with the “Enter key” password for <mwassl>, press Enter to use the same password as the keystore password
- Run this command to verify the contents of the keystone
- keytool -list -v -keystore mwassl.jks
- When prompted, enter the keystore password note in Step 3. The basic information about the generated certificate is displayed. Verify that the “Owner” and “Issuer” are the same. Also, you should see the information you provided in Step 5 and 6.
The certificate is now complete and ready to use. Move this file to $INST_TOP/admin/install. If you run in 12.2.X, please move to both RUN and PATCH.
Screenshot of how we verify the self-signed certificate:

Next, we edit $INST_TOP/admin/install/mwa.cfg file to enable the SSL. For 12.2.X, please update for both RUN and PATCH. In the file, there are four properties related to SSL.
mwa.Security.SSLSocket=TRUE
mwa.Security.KeyStore=mwassl.jks
mwa.Security.KeyStorePassword=mwasslpassword
mwa.Security.Protocols=TLSv1
mwa.Security.CipherSuites=SSL_RSA_WITH_RC4_128_SHA,TLS_RSA_WITH_AES_128_CBC_SHA,TLS_DHE_RSA_WITH_AES_128_CBC_SHA,TLS_DHE_DSS_WITH_AES_128_CBC_SHA,SSL_RSA_WITH_3DES_EDE_CBC_SHA,SSL_DHE_RSA_WITH_3DES_EDE_CBC_SHA,SSL_DHE_DSS_WITH_3DES_EDE_CBC_SHA
The mwa.Security.KeyStore should be the filename of the SSL certificate we generated earlier, and mwa.Security.KeyStorePassword should be the password we use when generating the certificate.
Once done, restart the MWA services and now we have the MWA server running in secure SSL!
Please note that once the MWA server runs in SSL mode, we can no longer use non-secure MWA clients, like telnet clients, to connect. We have to use the MWA client that supports SSL mode to connect to the server. One such client is Intellinum Express Client, a native GUI client that supports SSL, available for Android, Windows CE/Mobile, and Windows PC.
As mentioned earlier, once we enable SSL, we can’t use the MWA dispatcher anymore as it does not decrypt/encrypt SSL data. One good option that we have tested to work with the Oracle MWA server or with Express Server is haproxy load balancer (www.haproxy.org). This is a high-performing and reliable TCP/HTTP software load balancer used by many large organizations in the world.
There are many good resources on the Internet on how to install and configure haproxy. Once installed and started, we can verify haproxy is running by using the command:
sudo service haproxy status

Similar to MWA which has configuration file mwa.cfg, haproxy has a configuration file haproxy.cfg. The default location is /etc/haproxy/haproxy.cfg. For reference, we have shown below a sample haproxy.cfg which runs the load balancer on port 10860 (think of this like MWA dispatcher port) and load balances to 3 MWA ports running on 192.168.1.232 port 10200, 10202, 10204 respectively.
global

        log /dev/log    local0
        log /dev/log    local1 notice
        chroot /var/lib/haproxy
        stats socket /run/haproxy/admin.sock mode 660 level admin
        stats timeout 30s
        user haproxy
        group haproxy
        daemon

defaults
        log     global
        mode    tcp
        timeout connect 30s
        timeout client  1h
        timeout server  1h
        option tcplog

frontend mwaproxy
  mode tcp
  bind *:10860
  default_backend mymwaservers

backend mymwaservers
  mode tcp
  server mwa1 192.168.1.232:10200 check
  server mwa2 192.168.1.232:10202 check
  server mwa3 192.168.1.232:10204 check
  stick-table type ip size 1m expire 30m
  stick on src
  option redispatch
The important relevant sections in haproxy.cfg are the frontend and backend. The frontend has the port it should listen for incoming connection and the backend lists all the mwa ports we want to load balance. The stick-table and stick are used for sticky sessions so in case a client gets disconnected from the server (due to WiFi interruption for example), the client can be forwarded to the same server it was connected to before the disconnection.
Notice that we do not do anything special to implement TLS passthrough. It’s enough to pass the traffic to the backend servers and let them handle the encryption and decryption. That’s all there is to TLS passthrough.
Don’t forget to restart haproxy after any changes in haproxy.cfg with the following command:
sudo service haproxy restart
Now we can connect the MWA client to the host/port where haproxy is running and it should forward the connection to the MWA server. We have verified that all features in warehouse management software (Express Server) such as transaction personalization, voice interface, e-signature, and quick reconnect are working in SSL stand-alone or SSL with haproxy.
Hope this article has been useful for you. If there are any questions or you would like to try our products Express Client or Express Server, feel free to reach out to inquiry@intellinum.com.